After learning about light source, shadows, and stippling, the 5th graders drew their shoes using black marker. They then added stippling to suggest shadow and light. They then cut out their shoes, glued it onto a colored paper, and collaged.
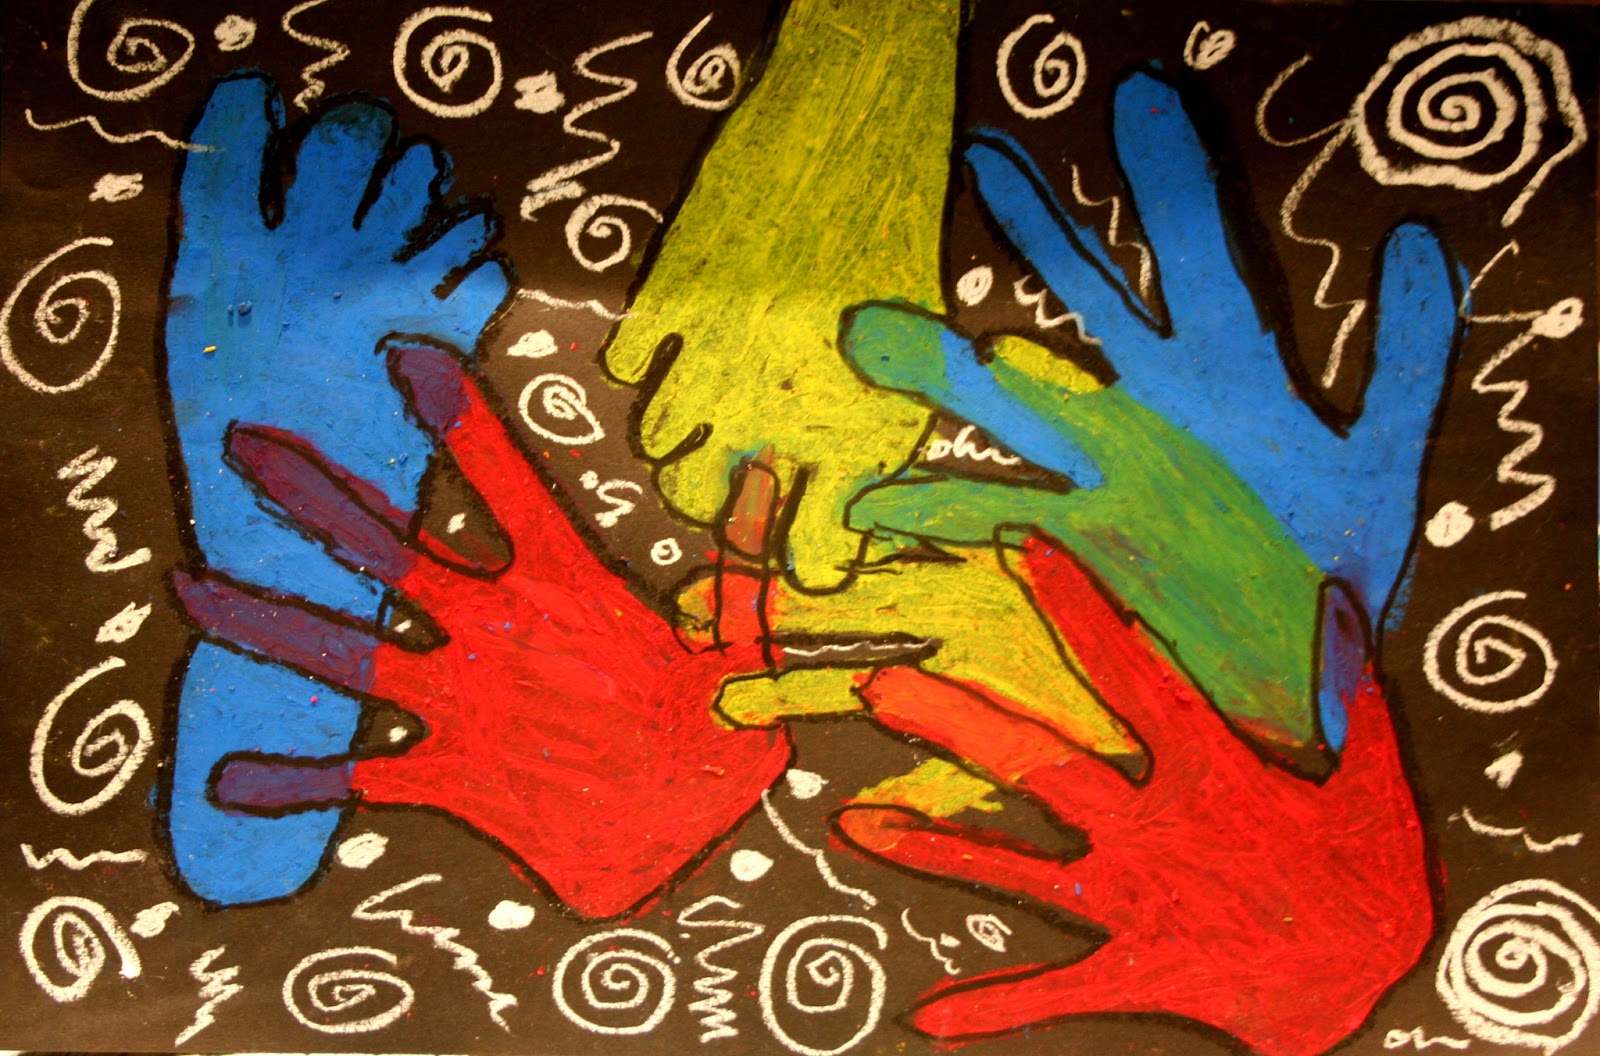
After learning about primary and secondary colors, namely how to mix secondary colors only with primary colors, the 5th graders received a black sheet of paper and a pencil.
I instructed them to use a pencil to trace at least 5 hands or 5 feet or a combination, making sure to overlap each. Then they designated each hand or foot a primary color. The non-overlapping areas would remain that original primary color; the overlapping areas would be the resulting secondary color.
They then outlined it all in black and used white oil pastel to create interesting patterns and lines.
In 5th grade we learned how to create different emotions using lines. After demonstrating how to create a few different lines, each student received a worksheet on which they drew lines that they felt could go alone with different musical numbers I played for the class.
They then received a black sheet of paper and a bottle of glue. After creating various lines and allowing time to dry, they used chalk pastels to color. The results were amazing!
This project was done with the 3rd, 4th, and 5th graders in the after-school art program. I pretty much gave them free reign over a box of scrap felt, scissors, and glue. These are a few of the results!
This project was done in the after-school art program by 3rd, 4th, and 5th graders. Using pre-cut paper, the students used a rule to measure and draw 3x3 inch squares. Then using a black marker, students created bubble letters of their name and in the remaining squares added images of things they like and define them.
In 4th grade we discussed the purpose of advertising, mainly to sell things. They then analyzed various shoe ads and completed a worksheet. Finally, the students designed a shoe to create.
They first used newspaper and tape to form the shoe. Then after 2 layers of paper mache, the students paint using tempera. Finally, I allowed to create shoelaces with yarn and left out glitter paint and sequins.
In 4th grade we discussed Joan Miro's use of line and shape. Then the kids used permanent markers to create their designs and colored pencils to color it.
We learned about Wayne Thiebaud, specially his subject matter, manner of painting, and association with the Pop art movement. We also discussed foreground, middle ground, and background.
After demonstrating how to draw cupcakes and pies, I instructed the kids to draw at least 3 desserts, one in the foreground, one in the middle ground, and one in the background using black oil pastel. Then they used watercolor to paint (I encouraged them to use bright, bold colors) and some added a sprinkle of salt for a fun textural effect.
After learning about the originating continent and some of the characteristics of Aboriginal art (dots and intricate patterns inside animals), the 3rd graders made their own Aboriginal-inspired fish. On tag board, the kids used an oil pastel to create shapes, lines, and patterns. Then they used tempera paint to color.
The following art class, we turned the fish around and performed the same process. Many of the kids were upset that their name was clearly visible on their fish. I encouraged them to "hide" their fish by extending various lines and shapes from each letter. After this process, you could barely make out the name and it looked awesome! The final step was adding extra details with white oil pastels and various string.
In 4th grade we learned about color mixing and gradients. After showing them step-by-step how to draw their own lizard, they set to work drawing their own with permanent marker and later coloring with chalk pastels.
4th graders had fun learning about primary and secondary colors, the color wheel, and mixing colors.
They first used permanent markers to create a color wheel (a right side up and upside down triangle) and various shapes, lines, and patterns on their white paper. They then used chalk pastels to color the image. They enjoyed trying to stump their classmates, "See if you can find my color wheel!"
In 2nd grade we learned about Seurat and La Grande Jatte. We discussed pointilism (to make a picture using dots) and then experimented with different ways to utilize pointilism. The kids used permanent markers to create 3 images, then made marker dots on one, glued hole puncher circles on another, and painted dots (using the opposite end of a brush) on the last.
It was a struggle to get the kids to finish their pictures. Many became exhausted by the project fairly quickly even despite intentionally using small pieces of white paper. I may cut the white paper again in half next time.
This project was used for the after-school art program and was actually done by 3rd, 4th, and 5th graders. The beauty of this project is that it can be used and modified for various grades.
The first step was to use newspaper and tape to shape the animal. After two layers of paper mache was applied, the kids painted with tempera.
In 3rd grade we discussed the different purposes of masks (entertainment, protection, to frighten others, for religious purposes, etc.) and a few world examples were shown alone with a you tube video.
The first step in creating the masks was to use cardboard and tape to create 3D extensions such as noses, eyes, ears, and mouths. After two layers of paper mache were applied, the kids painted with tempera paint. The final day we decorated the masks using various sting and sequins.
We discussed Faith Ringgold: her unique quilt art, her personal background, emphasis on family and community, and Tar Beach.
This was quite an involved project. The first step was to create the background. Each kid got a sheet of white paper, pencil, and square stencil. Each drew 15 squares, cut them out, used crayon to make fun pictures and designs, then painted each with tempera cakes and set to dry.
To target the family and community aspect of Ringgold, we discussed the importance of sharing in a family and community, and the next week all the squares were mixed up. They all shared their squares; no one had their own. The kids glued down 10 squares on the perimeter of their white sheet of paper. Then the kids used a smaller white sheet of paper to draw a city scene and a pictur eof themselves flying above the buildings, just like Faith Ringgold in Tar Beach.
At the end of the project, I read Tar Beach to the class.
Before any school break, I usually try to offer an open-ended project for all grades that kids can take home right away. Before winter break, I set out two big boxes of paper scraps, glue sticks, scissors, and directions for how to create a collage penguin. I told the kids that my penguin example was pretty boring and that they could create any kind of penguin they wanted. They had quite a bit of fun with the project and it was great seeing all the creativity.